How to Get Rid of Black Mold on Walls and More

Indianapolis Drywall and Painting Contractors 317-454-3612

Indianapolis Drywall and Painting Contractors 317-454-3612

Black mold is dangerous. Not to mention unsightly, disgusting, smelly, and destructive. Needless to say, black mold is a problem and should be treated and eliminated immediately upon discovery. If you have recently discovered a festering wall or other area of your home that has been consumed by black mold, it is time to take necessary action and get rid of it for good.

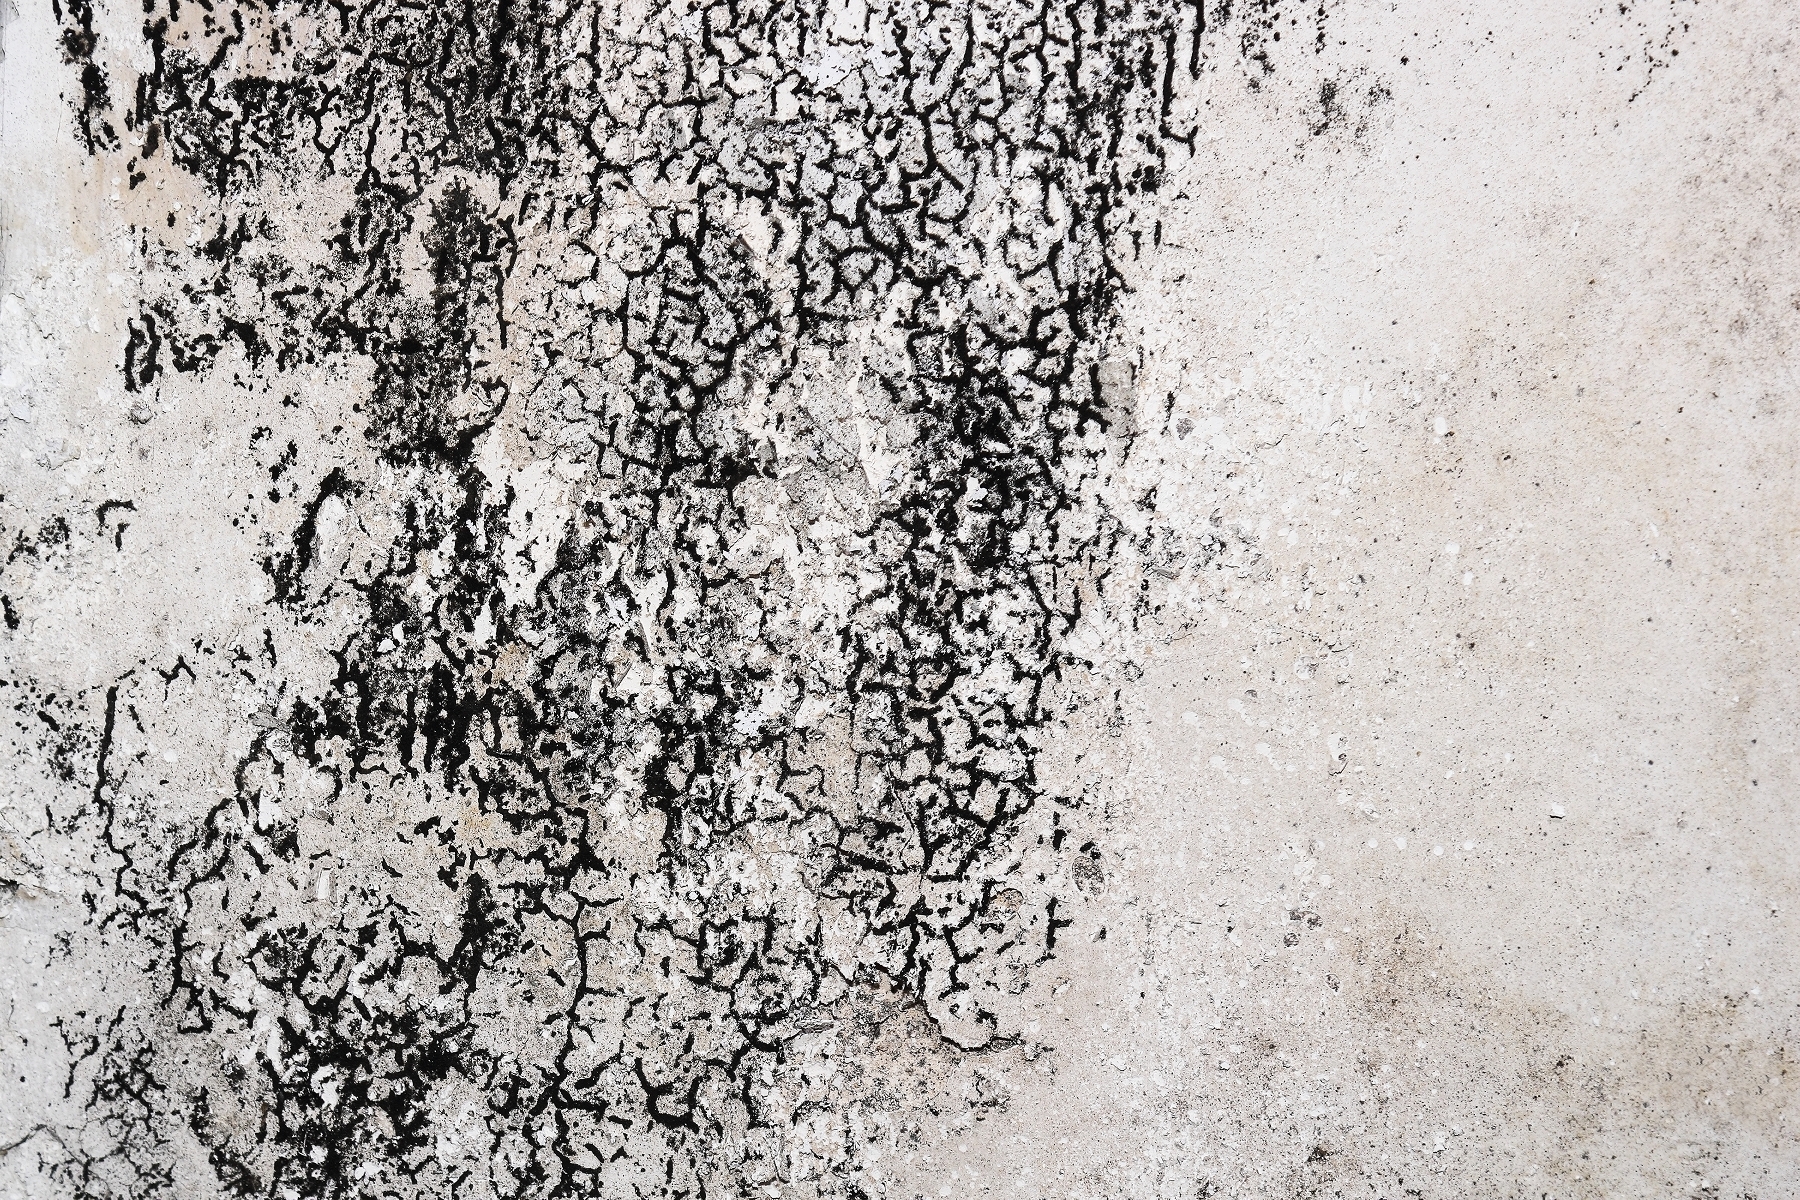
Although minor black mold remediation can be done on your own, large-scale projects require professional operations. Make that assessment with the help of a trained mold remediation contractor. They can determine whether or not the mold infestation is on a small scale or a large one. Sometimes the degree of mold damage is not always exposed, making it imperceptible at first or second glance.

Once you have a good idea of how extensive the black mold is in your property, you can determine whether or not you require professional services. If you can tackle the project on your own, continue reading and learn an effective method of black mold removal and remediation.

Black Mold Removal

When working with mold, it is vital to wear a respirator, or a face mask designed for mold spores, to protect yourself from potential health complications related to mold spore inhalation. All exposed skin should be covered as well. As mentioned, the first step to getting rid of black mold is to hire a professional to determine the extent of damage. If it is decided that the infestation is manageable on your own, you are ready to continue to the process.

The next place to begin is identifying the cause behind the mold growth. This might also require the help of a trained professional, perhaps a plumber or general contractor. This is because the source of mold growth could be from a water leak or appliance condensation in wall, pipes, roofs, or foundations of a property. These leaks or condensation issues need to be resolved before a mold problem can be eliminated.

When the first two steps are done, it is time to close off the affected area. Vents need to be covered, doors and windows should be tightly shut, and entries or openings need blocked off with plastic tarp and duct tape. The area must be entirely sealed to the best of your ability. Place floor fans, facing outward, in entry ways helps to push airborne spores outside.

Before starting any actual mold removal, spray the affected area and mold with water. This helps reduce the amount of airborne spores when moving them around. Using a brush or sponge, scrub the mold away with soap and warm water. Regular dish detergent is fine. Remember that not all mold spores are colored or visible, so scrub the entire area, as well as, any surrounding areas to make sure all mold is removed.

Once the area is scrubbed with warm soapy water, repeat this process, only this time, using bleach. Apply bleach to the entire area and then rinse with fresh water and a clean rag. If you do not have bleach or dislike using bleach, vinegar will do the trick as well. Or you can purchase a mold cleaning solution at the store. Discard all equipment and supplies used to clean the black mold in a large garbage bag and take it outside through an entrance other than the main entrance of the property. A garage, patio, or loading dock entrance is best.

Drywall Replacement and Painting

Once the mold is removed, you will likely need professional drywall installation and painting services to restore the areas that were affected by the mold. Be sure to choose a licensed general contractor who specializes in residential and commercial drywall and painting projects. They have the comprehensive resources to restore interior walls and foundations back to their original condition.

Choose Restoration By L&B LLC!

Home Repair Service 317-454-3612

Residential and Commercial Remodeling
317-454-3612

Call Restoration By L & B, LLC at 317-454-3612 for affordable remodeling, drywall, and painting services in Indianapolis, Indiana. We are licensed general contractors who offer a wide range of residential and commercial remodeling services, including interior and exterior painting, drywall repair, and more. Contact us today to request a professional on-site estimate. We guarantee to BEAT any competitor’s price!

A Simple Guide to Repairing Chipped Paint

Indianapolis Painting Contractors 317-454-3612

Indianapolis Painting Contractors 317-454-3612

When trim, walls, and woodwork have several layers of old paint on them, they are more prone to chipping and peeling. And with so many layers, old paint doesn’t just chip, it leaves behind craters and pock marks. To repair such blemishes, you need more than just a paint brush and a few minutes of time for touch ups. But that doesn’t mean that you need to strip down walls, sand them smooth, and start over entirely with fresh paint.

By using the right process, you will save time and ensure that your results are even, unblemished, and long-lasting. Continue reading for a simple guide to fixing chipped paint.

Preparation and Products

When shopping for supplies, be sure to buy the proper spackling compound. You can get spackle for drywall or for wood. Ask a store attendant to point you in the right direction. Also purchase the right grip sandpaper. Too fine won’t be effective or efficient, while too course can be damaging. Stick between 120 and 150 grit sandpaper. One or two patches is all you need unless you have a large-scale project. As for the rest of your supplies, you will need them to first level out the surface surrounding the chip, and fill it back in without any visible seams. Let’s get started!

What You Need:

• Putty Knife
• Spackling Compound
• 120 – 150 Grit Sandpaper
• Latex Primer
• Paint Color
• Paint Brush
• Drop Cloth

Step 1

Lay down your drop cloths to protect surrounding floors and furnishings from paint splatter. Then clean the chipped area and the areas surrounding it with clean warm water and a little dish soap. Allow it to dry completely before moving forward with the next step.

Step 2
Using your putty knife, scoop out a moderate amount of spackling compound and smooth it over the chipped area and its outer perimeters. Be sure to slightly overfill the area (you’ll be sanding it down later) and use multiple stroke directions to fill in all the nooks and crevices.

Step 3
Once the spackle is smoothed down adequately, allow it to dry completely. Depending on the size of the area and the amount of spackle used, drying times can range anywhere between a few minutes and a few hours. Generally, smaller projects will dry within 15 to 20 minutes, while larger patches will take at least an hour.

Step 4
Check to see if the spackle has dried completely. When wet, spackle resembles a gray-like color, but when dry it is bright white. If it is dry, you can begin the sanding process. Lightly sand down the spackled area until the surface is entirely level and smooth.

Step 5
Using a small or medium-sized paint brush, apply a coat of latex primer on the patch. This will help the paint color blend perfectly into the surface.

Step 6
Apply just one coat of paint color onto the patch, smoothing it out until well-blended and even with the rest of the surrounding surface color.

Indianapolis Painting Contractors

Home Remodeling and Painting

Home Remodeling Contractors 317-454-3612

Call Restoration By L & B, LLC at 317-454-3612 for professional painting services in Indianapolis, Indiana. Owner Lee Elliot, and his team of drywall and painting contractors, have decades of experience in the home remodeling and restoration industry. They offer a wide range of interior and exterior painting and drywall services for commercial and residential properties. Call 317-454-3612 to schedule an estimate for Indianapolis painting service, today.