What to Do if You Strip a Screw Head

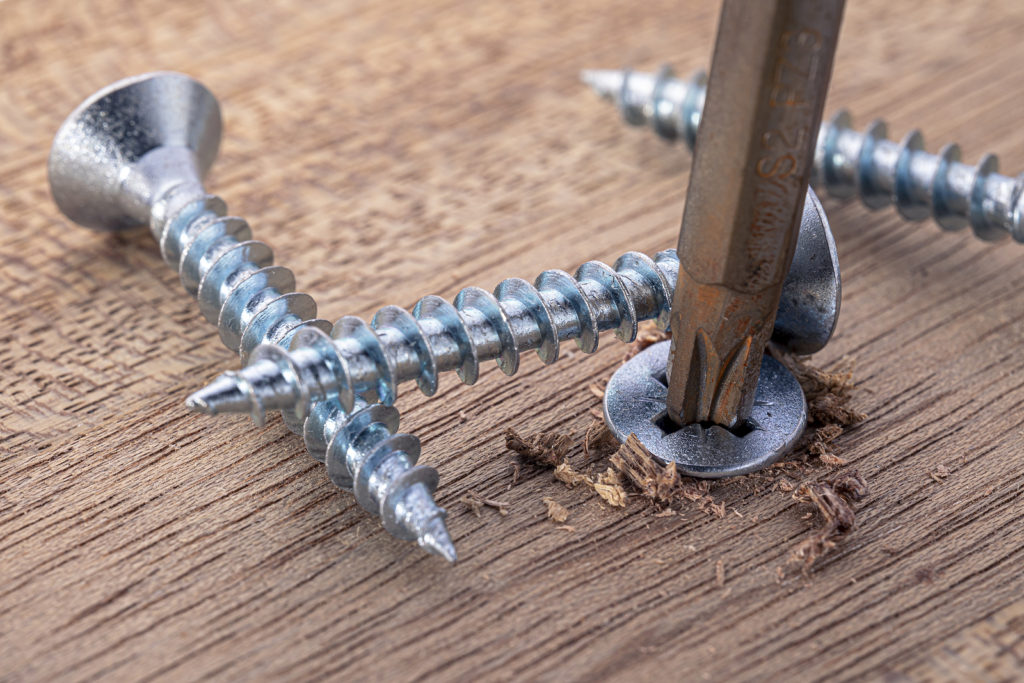
Whether you forgot to drill a pilot hole or drove a screw too quickly, nothing puts a stop to your woodworking project faster than a screw with stripped head. Fortunately, there’s a smooth and efficient way to deal with this frustrating problem. All you need are a few tools and supplies, all of which are reasonably-priced and sold at any local home improvement or hardware store in your neighborhood.

Continue reading to review a basic guide to removing stripped screws from wood.
Indianapolis Indiana General Contractors
Indianapolis Indiana General Contractors 317-454-3612

How to Manage a Stripped Screw Head

Tools and Supplies You Will Need:

✏ Drill
✏ Screw Extractor Set
✏ Long-Nose Locking Pliers

For Screw Heads Above Wood:

Clamp your locking pliers onto the screw, positioning them as close to the wood as possible.

Once you have a solid grip, use the pliers to gently turn the screw counterclockwise. Be gentle to avoid snapping off the screw head.

You can use a piece of cardboard to place around screw to prevent any accidental scratching.

For Screw Heads Level With or Below Wood:

For screw heads that are flush with the wood surface or slightly below, you will need to use your screw extractor set.

Using your drill, make a 1/8 inch deep hole in the top of the screw head. It should be large enough to accept the largest screw extractor that will fit the head.

Position the extractor into the hole you drilled, and then slowly turn it counterclockwise and press down until you feel the extractor threads catch.

Slowly turn the extractor to wind the screw out just enough to where you can grab it with your gripping pliers.

How to Prevent Stripped Screw Heads

☑ For screws 2 1/2 inches or longer, rub the heads with candle wax or beeswax to reduce friction.

☑ Do not forget to drill pilot holes for your screws.

☑ Choose a drill set that lets you drill pilot holes in multiple sizes to match your screws.

☑ Drill larger pilot holes for hardwoods to avoid splitting.

☑ Always choose the proper screws for your project.

When in Doubt or Over Your Head

If you have a home improvement project you’ve been waiting to get done, consider professional home remodeling services for outstanding results in a convenient time frame. Need a deck built? Or perhaps some drywall installed? These are the types of services that are better performed by a licensed contractor who retains the proper tools, training, and skills to deliver responsible work and professional results.

Do you need some drywall renovations at home or work? Contact Restoration By L & B, LLC at 317-454-3612 for affordable handyman repair and general contracting services in Indianapolis, Indiana. We perform commercial work too!

You Might Also Like:

Suggested Maintenance for Wood Decks and Patios
How to Install an Interior Sliding Barn Door
How to Repair Nail Pops in Walls

Indianapolis Indiana General Contractors
Indianapolis Indiana General Contractors 317-454-3612

Professional Tips for Staining Wood Decks

It’s that time of year when we all want our backyards and outdoor leisure spaces to be fixed up and ready to go for the warmer Indiana seasons. If you are not happy with how your wood deck is looking this year, why not try staining it? Staining a wood deck is one of the easiest and most effective strategies for instantly reviving or refreshing the look and performance of a wood deck.

Continue below to learn the tips you need to know for staining your own wood deck, and who to trust for local Indianapolis handyman service if the project turns out to be too much for just yourself.

Indianapolis Deck and Patio Remodeling Contractors 317-454-3612

How Often Should I Stain My Wood Deck?

The frequency at which you reapply stain to your wood deck depends on various factors, including the degree of wear and tear, weather patterns, type of wood, type of stain previously used, and more. The general rule of thumb, however, is to re-stain a wood deck every 5 to 7 years or so.

But if your wood deck is looking a little ragged, you can re-stain for an instant, updated look. At the same time, it is important that you do not reapply stain to your wood deck if you do not have to. This can lead to a build of chemical layering that can actually cause more deterioration.

Do a water beading test to see if your wood deck needs a new coat of stain. Simply pour one cup of water onto the deck surface and watch how the water dissipates. If the water soaks right in, you definitely need a new coat of stain. But if the water is still beading after 10 minutes or so, your deck should be adequately protected for another year.

Seasonal Deck Staining Tips

Do not use a poor quality deck stain. Ask your home improvement store clerk for recommendations on the highest rated products within your budget.

Always read the directions on your stain in full before getting started. Don’t even unpack your supplies until you have read through the entire set of directions.

Be sure to clean the surface of your deck well before you apply your first coat of stain. The instructions on your stain product will likely prompt you to do this too.

You need to prepare to fend off moisture during and after your deck staining project. Moisture is the ultimate enemy to your deck stain results. Be sure there is no rain in the forecast. After you clean your deck to prepare for stain application, be sure it is totally dry before getting started.

After applying your first coat of stain, wait at least 24 or 48 hours before applying another coat. Then wait another 24 or 48 hours before walking on the surface.

Do you need some professional handyman work done around the house this season? Contact Restoration By L & B, LLC at 317-454-3612 for affordable home renovation services in Indianapolis, Indiana. We serve commercial clients, too.

You Should Also Read:

A Routine Cleaning Guide for Composite Decking
Suggested Maintenance for Wood Decks and Patios
The Proper Climate for Deck Staining

Indianapolis Indiana General Contractors
Indianapolis Indiana General Contractors 317-454-3612

What You Need to Know About Cubic Yard Calculations

Imagine a box that is 1 yard high, 1 yard wide, and 1 yard deep. Now imagine that the space inside is filled with liquid. Right now, you are imagining the exact measurement of one cubic yard, it is the volume. Essentially, you can remember a cubic yard as a cube that measures 1 yard in all directions. If you are doing any sort of construction work, such as carpentry, masonry, or remodeling, it is important to understand how to measure cubic yards accurately.

Continue reading to learn what you need to know about cubic yard calculations, starting with common materials that are typically measured with this system.

Indianapolis Handyman and Remodeling Services 317-454-3612

A cubic yard is the volume of space or mass that fits inside a space that measures one yard wide, by one yard deep, by one yard high. Cubic yards are used frequently to measure all sorts of materials. Some of the most common materials and projects measured in cubic yards include concrete, mulch, soil, compost, gardens, patios, pools, parking lots, and more.

Measuring in Cubic Yards

In order to properly measure your needed materials in cubic yards, all dimensions must be converted into the same measurements first. Here are the basic increments you need to know to do this correctly:

1 Cubic Yard = 27 Cubic Feet (3’ x 3’ x 3’)

1 Cubic Yard = 46,656 Cubic Inches (36” x 36” x 36”)

As an example of how to apply this math, imagine that you are on the market for enough concrete to fill a slab that is 6 inches thick, 12 feet long, and 12 feet wide.

In order to calculate how much concrete material you will need, you must first convert everything to a common dimension. In this case, feet would work best. This means that 6 inches would convert to ½ a foot, or 0.5 feet, and the rest would stay the same.

Then you would simply multiply all three values together to find the number of cubic feet, like this:

0.5 x 12 x 12 = 72 Cubic Feet

Continue by dividing the answer to the above equation (72 cu. ft.) by the number of cubic feet in a cubic yard (27 feet) to get the right amount of material you need in cubic yards, like this:

72 ÷ 27 = 2.67 Cubic Yards

SOLUTION: You’ll need 2.67 Cubic Yards of concrete to fill your slab!

Where to Get Professional Remodeling Service

Call Restoration By L & B, LLC at 317-454-3612 for affordable home remodeling services in Central Indiana and its surrounding areas. Our Indianapolis general contractors provide a wide range of services for both commercial and residential properties, from general handyman services and home remodels, to full-on renovations, additions, conversions, and more. Request an estimate, today!

Residential and Commercial Remodeling

Do-It-Yourself Home Security Renovations

Your home is one of your greatest assets, so it is vital that you make certain considerations in regards to home security. It is common practice for burglars and petty thieves to target upscale residential neighborhoods and communities in hopes of coming by some better loot. Even the most family-forward, child-friendly developments are not safe from petty crimes.

For this reason, home security should be a priority for all homeowners. Continue reading for some helpful tips to improve your home’s resistance to crimes like break-ins, vandalism, and petty theft. 

Home Remodeling Contractors 317-454-3612

DIY Home Protection

A homeowner should never stop improving on their home security. It is an area of home-ownership that should be re-addressed every year. There are several things a homeowner can do all on their own to improve a home’s security and maximize protection. A few changes in habit, some old tricks, and a little knowledge is all it takes to up the ante when it comes to the security of your home. For instance, do not leave a hidden key. This is one of the first places a thief will look when breaking and entering a home. More importantly, do not open doors to strangers, especially in evening or early morning hours when door-to-door salesmen are not working.

What You Can Do:

✒ Dead bolt and lock up everything, such as sheds, barns, boats, bikes, and more.

✒ Install a front door camera or video doorbell device, like Ring

✒ Purchase a safe that bolts to the floor or wall for high-priced or priceless valuables

✒ Install motion-sensor lighting outside.

✒ Install electronic doorknob pads that only work with a code

✒ Leave a radio playing in the garage on weekend nights.

✒ Place a thick board or rod in the tracks of sliding glass entry doors.

Professional Home Security Renovations

Not all home security renovations should be carried out on your own. For some areas of home security, it is necessary to hire a handyman or general contractor for accurate and professional installation and service. Here are some professional home security tips that are the best solution for adequate home protection:

✔ Install deadbolt locks on interior/exterior doors.

✔ Choose a programmable combination keypad for entry locks.

✔ Install deadbolt strike plates and door jams.

✔ Install an eye viewer (peep-hole) in front door and back doors.

✔ Add a track lock to sliding glass entry doors.

✔ Re-seal/re-caulk first floor windows.

✔ Trim tall trees near windows and second stories.

✔ Install a home alarm system.

✔ Install exterior motion sensor flood lighting.

✔ Install more exterior lighting.

✔ Install a video monitoring system.

Contact Our Trusted Indianapolis General Contractors

Call Restoration By L & B, LLC at 317-454-3612 for affordable property remodeling services in Central Indiana and its surrounding areas. Our Indianapolis general contractors provide a wide range of services for both commercial and residential properties, from general handyman services and home remodels, to full-on renovations, additions, conversions, and more. Request an estimate, today!

Residential and Commercial Remodeling

Recommended Renovations for a New Puppy

When you decide to get a new puppy, you are bringing home more than just a pet; you’re bringing home a new member of the family that will be there with you for years to come. For this reason, why not upgrade or convert particular areas of your home to meet the needs of your new dog, as well as, make life more convenient for the rest of the family? Many homeowners have chosen this route, which has proven to reap certain benefits, including puppy cleanup, penning, and even property value!

Continue reading to learn some of the top recommended renovations to have done when adding a pup to the family.

Home Remodeling and Renovation 317-454-3612

? Doggy Door

Although it may be obvious, one of the greatest and simplest additions you can make for your new puppy is a doggy doors. You have two primary options to choose from when it comes to doggy doors; you can buy a kit and install it in an existing door, or you can purchase an entire door manufactured with a doggy door in it. Both types will range in price, quality, size, dimensions, retailers, and more. Installing such doors can be very tricky, and if not done properly, can be unsafe. So it is strongly recommended to pass on the duty to a trained handyman.

? Floor Replacement

With a potty trained pup, you might not need to worry so much about your carpets. However, most pups do not come pre-potty trained, which means you and the rest of the family will have to ride the learning curve along with your new friend. In order to maintain a hygienic and comfortable interior environment, and sanity for that matter, you should consider ripping out your carpets and installing wood, laminate, or tile floors. Hard-surfaced floors like these are much easier to clean, and retain their quality and appeal for a lot longer than carpet. Rather than replacing all of the carpet in your home, you can simply appoint a common room, and change it to another flooring material.

? Backyard Fencing

If you have a dog, it will likely want some room to run around and exert energy; otherwise, you can find yourself with an anxious, poorly behaved dog. One way to provide this privilege without jeopardizing safety is to install a property fence. There are infinite materials, styles, and designs to choose from when it comes to installing a backyard fence. You can even have your fence customized to match your home. Rather than adding a full-property fence, you can simply fence in a small area of the yard.

Indianapolis Home Remodeling and Handyman Professionals

Residential and Commercial Remodeling 317-454-3612

Call Restoration By L & B, LLC at 317-454-3612 for affordable building repairs in Central Indiana and its surrounding areas. Our Indianapolis general contractors provide a wide range of services for both commercial and residential properties, from general handyman services and home remodels, to full-on renovations, additions, conversions, and more. Request an estimate, today!

Quick Guide to Caulk Removal Around the Bathtub

The good news is that you are ready to re-caulk an area of your home that has been bothering you for quite some time. The bad news is that you have to first remove the old caulk around the tub before you can apply the new stuff, which can take some time. Now the better news is that the bad news isn’t so bad; removing old caulk can be done all on your own in just a short series of easy steps!

Continue reading to review a quick guide to removing old caulk around the bathtub, including what you should do if the job proves to be too big for you to manage.

Home Remodeling and Handyman Services 317-454-3612

Home Remodeling and Handyman Services 317-454-3612

What You Will Need

All of the supplies and tools you will need to remove caulk can be found at any local home improvement or hardware store. They are all reasonably priced too, so you don’t have to worry about spending outside of your budget to complete your caulking project. Here is what you will need:

🛁 Tub-and-Tile Caulk
🛁 Caulk Remover Product
🛁 Needle-Nose Pliers
🛁 Utility Knife
🛁 Putty Knife (or use the hook-end of a 5-in-1 painter’s tool)
🛁 Trash Bin
🛁 Work Gloves
🛁 Paint Brush (or foam brush)
🛁 Non-Ammoniated Bath Cleaner
🛁 Bleach
🛁 Water
🛁 Plastic Scrubbing Pad
🛁 Cloth or Rag

How to Get Started

The first step is to soften the old caulk with your caulk remover product. Follow the manufacturer’s instructions before applying the caulk remover to the old caulk.

Once the old caulk is soft, use your utility knife to slice through it, directly. Be sure the blade is fresh. Most of the old caulk should fall off easily.

Special Note: If there are extra layers of old caulk, or it is just very thick, you may need to pull it free from the joint using needle-nose pliers.

After you have removed most of the old caulk, use your putty knife or painter’s tool to rake away the rest of the remaining chunks from the joint.

With the old caulk gone, you are now ready to cleanse and disinfect the surface area. You can use a non-ammoniated bath cleaner to remove soap scum and more. Do not use cleaner with ammonia because it can produce dangerous toxic fumes when combined with bleach.

After you have removed soap scum and dirt, check for mildew. If you see mold or mildew, combine 1/3 cup of bleach with 1 gallon of water, and use your paint brush to apply it directly to the affected surface.

After you apply the bleach solution, use your plastic scrubbing pad to remove any mold and mildew present. Next, rinse the area with water and dry it thoroughly with a clean rag.

Now you are ready to apply your new caulk!

What To Do if the Job is Too Big

Home Repair Service 317-454-3612

Residential and Commercial Remodeling
317-454-3612

Call Restoration By L&B LLC at 317-454-3612 for Indianapolis home handyman services at competitive prices. Owner and general contractor, Lee Elliot, is happy to answer all your questions about home remodel planning, prices, and process. And don’t forget; we guarantee to BEAT any prices quoted by our competition! Request a written estimate, today.

Think about Installing Carbon Monoxide Detectors in Your Home

Indianapolis Handyman Service  317-454-3612

Indianapolis Handyman Service 317-454-3612

Are you aware that carbon monoxide detectors save lives? Carbon Monoxide (CO) is an odorless, invisible, and extremely dangerous in large amounts. It can literally kill humans and animals within minutes in large-enough doses. This is why it is vital for all homes and buildings to have properly installed carbon monoxide detectors for superior protection and safeguarding. Don’t risk the safety of your children, loved ones, guests, pets, and more. Take preventative action by purchasing and installing high-quality CO detectors in your home or office. Save your life and the life of another with one simple precaution.

Carbon Monoxide Detectors

These detectors alert home and property owners in the case of an emergency. Without even realizing it, people create atmospheres for carbon monoxide on a regular basis. This is because anywhere gas, oil, charcoal, kerosene, or wood is burned, carbon monoxide will be present. Homes with fireplaces, barbecues, or appliances that use these examples of fuel can be prone to carbon monoxide manifestation.

Appliances that use kerosene, oil, or charcoal require regular care and maintenance to ensure they are properly functioning and safe to use. Without professional inspection and routine care, a home with such appliances can be vulnerable to carbon monoxide poisoning. It can discreetly be released into the surrounding environment and unknowingly consumed by humans and pets. One way to protect your family from accidents involving poisonous gases is to install a carbon monoxide detector for emergencies.

A person can experience dizziness, blurred vision, nausea, headaches, and confusion if over-exposed to carbon monoxide gas. The degree of each symptom will vary from mild to severe depending on the amount of contact. Although some symptoms may be minor, CO poisoning can have lasting effects on the body. Its symptoms are so closely similar to the common cold or flu that the illnesses is often misdiagnosed and overlooked. This makes carbon monoxide poisoning even more dangerous because it is not caught in time due to an incorrect diagnosis.

If a person is demonstrating any signs or indications of CO poisoning, be sure to get the person outside in fresh air; and then call emergency medical services or bring them to the emergency room immediately. Go back into the home or building and open all windows and doors. Turn on as many fans as you can find and circulate fresh uncontaminated air in, and contaminated air out. Also, be sure all combustion appliances are powered off. Once these measures are taken, leave the house and call professionals to investigate the scene and approve it safe again.

Professional Indoor Air Quality Inspections

Call a licensed professional to provide comprehensive carbon monoxide inspections and appliance maintenance and care to ensure your home’s safety. Receive free estimates and information regarding carbon monoxide prevention strategies and more. A professional can answer your questions about safe indoor air quality and protection. They can point you in the right direction when it comes to buying a carbon monoxide detector for your home or office.

Indianapolis Handyman Services

Home Repair Service 317-454-3612

Building Repairs and Remodeling
317-454-3612

Call Restoration By L&B LLC at 317-454-3612 for Indianapolis home handyman services at competitive prices. Owner and general contractor, Lee Elliot, is happy to answer all your questions about home remodel planning, prices, and process. And don’t forget; we guarantee to BEAT any prices quoted by our competition!

Tips for Commercial Building Maintenance and Repair

Commercial buildings, such as stores, banks, offices, and even apartment complexes, need regular cleaning and care to enhance durability, increase longevity, prolong aesthetic appeal, and protect the overall investment value. Just like a vehicle, a building also needs regular maintenance and care. Not only does routine maintenance and repair protect a proprietor’s investment, it also protects any guests, residents, customers, or visitors within the building each day. So what type of maintenance does a building require, and how often? Continue reading to learn about building maintenance and care, and who to call for professional handyman and remodeling service you can trust.

Commercial Handyman 317-454-3612

Commercial Handyman 317-454-3612

Building Maintenance

A building or commercial complex has several maintenance needs, and will eventually need common and predictable repairs along the way. It is important for building managers to inspect and assess a property’s condition on a regular basis, for safety reasons and to avoid larger and more costly disasters down the road. Regular building maintenance can stop a small problem from becoming a large and expensive problem, or worse, a liability. This can include aesthetic damages like peeling paint or wallpaper, broken floorboards, crumbling concrete, holes in drywall, and more. But it can also include plumbing and electrical repairs, structural repairs, siding repairs, and more. Below you will find some more common commercial building maintenance needs.

☑ Broken Stuff

When a door jams, a lock breaks apart, a window cracks, or a toilet clogs, a handyman or general contractor can provide assistance and find a solution right away. They can fix broken desk drawers, busted hinges, ripped carpet, and much more. More maintenance repair needs includes everything from office equipment and lighting, to major components like escalators, elevators, and security equipment. There is no end to the type of maintenance and repair needed on a daily basis, especially for larger properties. Large properties like shopping malls, movie theaters, hospitals, apartment complexes, and office buildings are guaranteed to need a repair almost every day. It is vital for all repairs to be fixed in order to avoid workers’ compensation claims, lawsuits, and more. It is suggested to keep a record of all the needed repairs over a month’s time, and then at the end of every month, call a trusted handyman to resolve them all at once.

☑ Door Locks and Keys

A handyman retains the tools and resources to replace door locks, door knobs, lost keys, security codes, and more. Most maintenance workers retain copies of office keys and can make a new one for someone that misplaced theirs; however, if your building does not have in-house maintenance staff, you are left to deal with these responsibilities on your own. If an automatic security lock is being stubborn, a handyman can usually find the override codes and fix the problem. This ensures protection over the building at all times.

☑ Emergency Repairs

Disasters happen and commercial buildings are no stranger to the feeling. Water leaks, flooding, no heat, no electricity, and more are all areas in which a handyman or remodeling contractor can save the day. They retain the training, knowledge, and equipment to quickly combat these kinds of disasters and get the building back in order, as soon as possible. Even a busted office window can count as an emergency when its 30 below outside! In this case, they can replace the glass or provide a temporary solution while waiting for the window warranty company to arrive.

Indianapolis Commercial Building Repairs

Home Repair Service 317-454-3612

Building Repairs and Remodeling
317-454-3612

Call Restoration By L & B, LLC at 317-454-3612 for affordable commercial building repairs in Indianapolis, Indiana and its surrounding areas. Owner and general contractor, Lee Elliot, is happy to answer your questions regarding commercial restoration and repair. We provide a wide range of services for commercial buildings, and retain the experience, skills, and resources to keep your building in tip-top shape! Request an estimate, today!

How to Properly Maintain a Bathroom Exhaust Fan

The bathroom exhaust vent fan requires annual maintenance to increase its performance value and lifespan. It is used for removing excess moisture in the air after a hot shower or bath. If never removed, this moisture can lead to mold and mildew growth, which is simultaneously dangerous to our health and destructive for our homes. Continue reading to learn how to properly clean and maintain bathroom exhaust vent fans.

Indianapolis Handyman Service 317-454-3612

Indianapolis Handyman Service 317-454-3612

How They Operate

Bathroom exhaust fans are powerful enough to exhaust nearly two million cubic feet of air per year if turned on for one hour each day! They draw air from the bathroom and vent it outside. As the vent draws air in, other airborne particles come with it, like dust, dander, and debris. These particles accumulate on the outer grid cover and fan motor, reducing performance value and efficiency. Both of these areas must be cleaned in order to maintain an operational bathroom exhaust vent. Dust and debris should be wiped clear every six months to a year, depending on the size of a bathroom and the number of occupants in a home.

How to Clean the Bathroom Exhaust Vent:

▥ To get started, you will need a vacuum with a brush attachment, a step stool, and a towel. The first step begins at the circuit breaker box. Be sure to flip the fuse to the bathroom fan so it has no power. This will eliminate electrocution accidents and injuries.

▥ Next, use your step stool to get in arms reach of the vent. Most are located on the ceiling, but some may be on the side of a wall, right beneath the ceiling.

▥ Slowly pull the grid cover to the vent down until it is a few inches from the ceiling. At this point, you will be able to see metal spring clips on each side of the grid cover. Press them together simultaneously and release them from their slots in the fan housing, then remove the cover from the ceiling entirely.

▥ Place the vent cover on the towel and vacuum it clean with your brush attachment. You may also use paper towel and mild cleaning solution to wipe it clean after vacuuming. Do this for both sides.

▥ Next, using your brush attachment, gently vacuum the fan housing and blower motor. You can choose to use the crevice tool vacuum attachment to reach deeper, harder-to-reach spots.

▥ Now you are ready to attach the cover back to the ceiling and exposed fan housing. To do this, hold the vent cover while pressing together both metal spring clips. Slip the clips back into their slots inside the fan housing. Gently push the cover back onto the ceiling.

▥ For larger-scale plumbing maintenance and handyman needs, contact a qualified general contractor who specializes in residential and commercial plumbing work. They can provide professional and affordable plumbing services for homes, apartments, office buildings, hospitals, retirement homes, schools, and much more.

Handyman Services in Indianapolis

Home Repair Service 317-454-3612

Home Remodeling
317-454-3612

Call Restoration By L & B, LLC at 317-454-3612 for affordable handyman repairs in Indianapolis, Indiana and its surrounding areas. Owner and general contractor, Lee Elliot, is happy to answer your questions regarding home restoration and repair. Call 317-454-3612 to schedule an assessment, today!

How to Install an Interior Sliding Barn Door

Door Installation 317-454-3612

Door Installation 317-454-3612

Sliding barn doors are one of the most currents trends for indoor home décor. They come pre-manufactured in several different styles, colors, and finishes, but you can also re-purpose an old door with a little sanding, priming, and painting! If you are considering a sliding barn door for an area in your home, you are on the right track toward that modern farmhouse country look you have in mind!

Continue reading to learn just how easy it is to install a sliding barn door system all on your own.

What You’ll Need:

🛠 Sliding Barn Door System w/Hardware
🛠 Socket Wrench
🛠 Drill
🛠 Drill Bit
🛠 Router w/Half Bit
🛠 Metal Cutter
🛠 Level
🛠 Awl
🛠 Utility Gloves
🛠 Safety Goggles
🛠 Tape Measure
🛠 Drywall Anchors
🛠 Mounting Board
🛠 Cutting Oil

The sliding barn door system that you choose should come with the proper hardware needed to install it, including 2″ flat steel track, track joint brackets, spacers, screws, lag bolts, carriage bolts, hanger rollers, a bottom roller guide, and bottom rollers. The rest of the tools and supplies you’ll need can be purchased at your local home improvement store of choice. They range in price depending on brand, retailer, quality, and more.

Are You are Ready to Get Started?

In the first step, you will need to attach the mounting board. This will provide the necessary support for the actual barn door. Start by custom cutting the mounting board to fit the tracks. Cut the mounting board to match the length of the track, but make the width just a little wider than the track. To secure the mounting board, you will need your drywall anchors, lag bolts, and spacers.

The next step involves putting together the track. Follow the manufacturer’s instructions to assemble the steel track using your joint brackets. You will need to cut the track to the length you need. It should be twice the width of the door. This will allow the door to open all the way to reveal the entire entry space.

Next, you will need to measure where the holes will go to attach the track to the mounting board and wall. Then use your metal cutting drill bit to drill the holes you marked. To prevent the drill bit from slipping on the metal, use your awl to make a seat for it while you work. Use your cutting oil in the drill holes to regulate heat.

Now you are ready to install the track and spacers. Measure the track system and use your lag bolts to attach it to the mounting board and wall. Be sure it is level!

Last, you will need to install the hanger rollers and the actual barn door. It is wise to have a partner for this step since the door is usually pretty heavy. Use the manufacturer’s instructions to connect the hanger rollers to the door. You will need the provided carriage bolts, nuts, and washers for this step. Use your socket wrench to tighten it all up, and then attach the bottom rollers according to the manufacturer’s instructions.

Now just hang the door on the track!

Indianapolis Door Installation and Handyman Service

Home Repair Service 317-454-3612

Home Remodeling
317-454-3612

For professional door installation and similar handyman services, call Restoration By L&B, LLC at 317-454-3612 for quality service you can trust. Owner, Lee Elliot, is an experienced general contractor who offers a wide range of professional home remodeling, repair, and restoration services at the most competitive prices around. In fact, we guarantee to BEAT any competitor’s price! Call 317-454-3612 to request an estimate, today.